Thanks for all the replies! I'll try ebay probably. I kinda agree that posting buy/sell posts here might dilute the sparse content we have.
Reven
joined 2 years ago
This is my scheme as well! Pretty much to the t. Except my HTPC is hypnotoad and nibbler is my NAS.
Thanks! I've used Darktable, but never saw it had a negatives module!
Yeah, thanks. I imagined as much.
Do you know if there is Photoshop plugin/action or some other stand-alone app? I've searched a bit, but most people recommend Negative Lab Pro. I don't have Lightroom, and anyway Negative Lab Pro is out of my budget.
I think it was Discovery. It was a replica. I found this (in Spanish): https://legadoexposevilla.org/el-transbordador-discovery-aterriza-en-sevilla/
I've got a bunch of old (1992) photos shot on 110 film with a point and shoot. I scanned the negatives with a cheap film scanner (from LIDL) a long time ago, and to be fair most of the 35mm film I had came out ok. But there are a couple of 110 rolls that I don't even know what to do with. The exposure is pretty bad and I think the film was exposed to light or not developed properly. I've played around with the photos trying to first get white balance right and then pushing the curves, but I can't get them right.
Any advice? I don't have the negatives with me, otherwise I'd try scanning them again just in case. Is there any workflow or app that I can use to try to recover them?

Yup, this is the last time I muck around with spamassassin unless the project gets a magical revival.
I think I got it working. I've got this in /etc/default/spamd:
OPTIONS="-x -q -u spamd --max-children 5 -H /etc/mail/spamassassin/"
and this in /etc/default/spamass-milter:
OPTIONS="-e example.com -u spamass-milter -i 127.0.0.1"
And it definitely reads user prefs from the database because I can change the 'required_hits' to 6.7 for a given user and I see this in the logs:
spamd[523771]: spamd: clean message (-0.2/6.7) for user@example.com:133 in 1.2 seconds, 24427 bytes.
I don't know how many different combinations of config flags I've tried, but these seem to do the job.
“Japanese” duplex
No, lol! I wish I had known of this or would've been clever enough to come up with something similar. I basically just yolo'd it the best I could. It was a torture.
I've put everything up on github: V6 conversion. Have fun. If you are going to get into this adventure, this might come in handy (it helped me): How to Build a Custom Keyboard From Scratch
That's a nice board!
I was initially excited about my Keychron V6 keyboard, I was looking forward to a thockier keyboard and wanted the customizability with qmk. The V6 seemed like a good match. But after unboxing it, I realized that the south-facing LEDs weren't ideal. I had just purchased Razer PBT keycaps, which I loved, but they didn't work at all with the LEDs and the escaping light underneath just blinded me.
I tried to make the setup work with custom keycaps from fkcaps (https://fkcaps.com/custom/5ELZPQ). While they were cool, they weren't the same as double-shot PBT keys. The setup wasn't ideal but I just stuck with it.
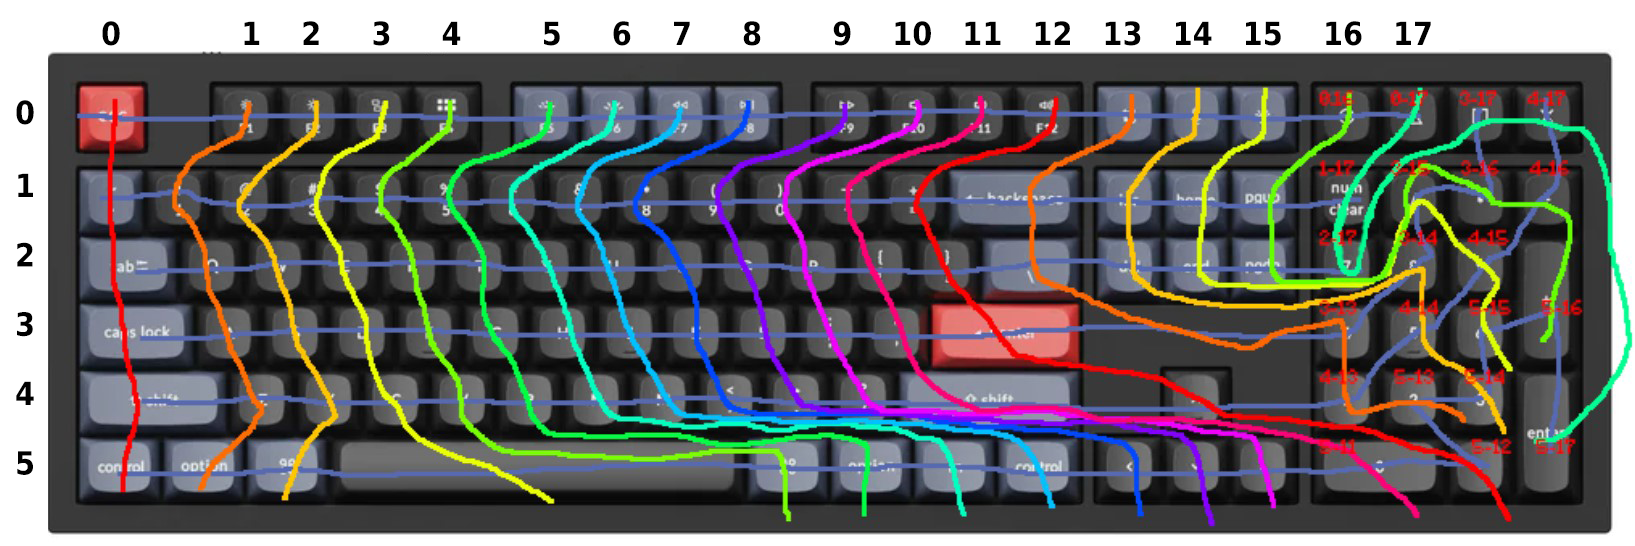
When I saw a YouTube video about building a keyboard with KiCad, I was inspired to try it myself. I used an ATmega32U, because I thought it would be easier to integrate, but it did have it's challenges: limited I/O meant I had to sacrifice the layout switch, and my matrix is best described as "tortuous". Despite a few errors on my PCB (a group of LEDs were not connected and I completely missed the holes for a stabilizer), the final PCB works amazingly well.
I've added a few photos below showcasing my setup before PCB assembly. You can see the light issues under the keys and how the laser etching from fkcaps isn't very durable.
EDIT: I've published the files to github in case anyone wants to have a look: V6 conversion


view more: next ›
Thanks for your reply. I managed to sell some of the things already but I agree that it might be a pain to have the group full of selling messages, so for now I’m ok. I did get some good feedback.