26
44
this is the handiest I have ever felt
someone had already posted the shape online so it was really simple

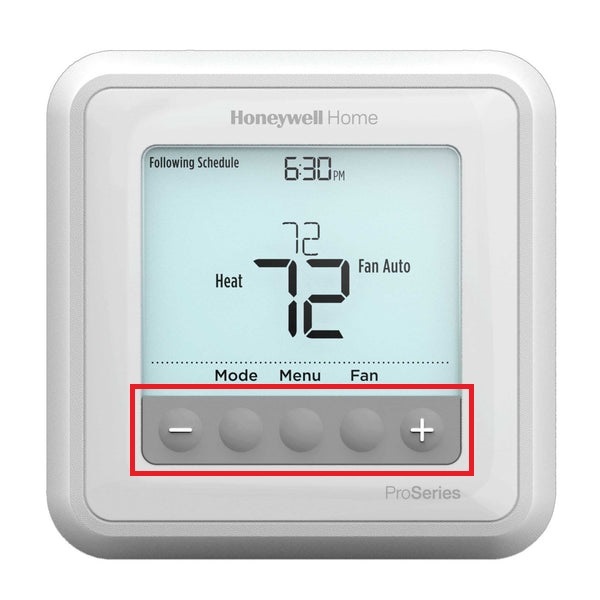
I think the title says it all but if needed - I'll edit this. Of course I googled but I got nowhere. Google results were total shit. Google won't help me if I don't know the exact name for that fucking thing. It's a very stupid design choice. Five regular old push buttons would be so much better.
About an hour ago I managed to stick it back on but I'm nearly 100% sure it's going to fall off again in week or two if not far sooner.
---
Edit
I don't mean part of the unit itself. I mean just the thin plastic cover over the buttons that's ~3mm thick.
I've been taken by a fey mood, not gonna lie. You ever be researching two different current hyperfixations, then reach a magical point where they suddenly intersect? That's where I'm at right now with hydrolysis and gems. I've been looking into building a machine to split water into oxygen and hydrogen for cutting stuff, because it turns out they're piss easy to make. Pretty simple so far, this is stuff some people learned in high school chemistry (not me, i never got past math). Hydrogen hot, add oxygen to make hotter, I at least know that from welding.
Then I find out that back in 1902, they figured out how to use just such a device, in conjunction with a special, also-shockingly-uncomplicated furnace, to grow huge corundum gems very quickly. That was also when I found out that corundum is a real thing and not a magic metal from skyrim. Apparently rubies and sapphires are the same thing, both corundum, just with differently colored trace minerals. Corundum itself is clear like diamond and almost as hard, 9 on the Mohs scale. So what's it made of? Just fuckin...aluminum oxide. Yeah, the stuff that's like 40 bucks for a 20 pound bag to use in sandblasters. 10 bucks for 2 pounds of the really pure stuff. It turns it into a big slug or rod of pure, genuine ruby or sapphire called a boule.
So my economy brain kicks in and I start looking up how much these boules go for online. One thing about these boules is that most of the time, you gotta split them in half lengthwise as they cool, so they don't shatter. This is how they're sold, as halves. Looking it up, a sapphire half-boule about 2 inches long goes for about 60 dollars. Sapphires seem to trend more expensive, probably as a result of lab rubies being more widely used industrially. One gemcutter on youtube (who was very nonplussed about this technique and coping about the literally microscopic differences in the resulting gems) said almost derisively that these boules can be grown in an hour or less. At that output and that price, what we have is a machine that takes cheap oxides and turns them into 2 dollars per minute.
And if I can eventually power the hydro machine with a solar panel, I'll be producing sapphires and rubies from nothing but oxides, electrolyte, water and sunlight
But wait, there's more! I have a small little electric jewelry furnace already, which while not suitable for conversion into a corundum furnace, is suitable for annealing the gems, cooling them slowly so the tension releases and they dont crack. So if I get this shit built, I will also have the built-in capability to produce massive, optical-quality gems. Also, being able to completely dab on every family holiday and gift-giving occasion for the rest of my life sounds nice.
So fuck it, why shouldnt I:
-Construct a hydrolysis machine
-Construct a verneuil furnace that is fueled by the hydrolysis machine
-Become a corundum dealer
-Invest the money into China
-???
-
Actually don't tell me why I shouldn't, I'm looking for encouragement in my alchemists journey
This post is about milk paint. I am currently in the tail stages of constructing my first piece of furniture, an antique inspired tool chest to hold my small collection and keep it organized and free from dust. The layout is largely based off of the anarchist's tool chest by Christopher Schwartz at lost art press, and is available free to download, only I am doing the plywood version which is available as a YouTube series as well. You can catch it here:
https://youtube.com/playlist?list=PLOUEnRdBNW4PsmAENQb-Y9UzrHnXzUjqc
Anyway I have been moving forward with a mix of hand tools and power tools depending on my mood or needs at the time, and being a beginning woodworker have left my share of tool marks, plane tracks etc, and of course a very healthy amount of wood filler. Any gap in joinery caused from being slightly out of square, or tearout when drilling countersink holes etc, I patched with filler and moved on, knowing the chest would be painted and nobody would be any the wiser.
Here is where milk paint enters the picture, in particular casein paint. One of the things I wanted to try was to finish the chest using an undercoat of red milk paint covered with black milk paint then finished with wax. Unlike modern plastic paints, these paints are less durable and wear through with time, the rationale being that as the chest is used the most frequently touched areas show the black wearing away with the red revealed underneath. This is a popular finishing technique particularly for antique inspired chairs.
I ordered casein powder and picked up borax from the local hardware store and ordered oxide pigments online. They are not hard to find. I made the binder, mixing the 5 parts casein to 2 parts borax in 18 parts water and heating to 140 and holding overnight. This is added to 3-5 parts of pigment and diluted with water for use.
You can see the grain of the wood really clearly in the OP pic. It shows the paint on a test piece where half is covered with a heavier first coat as there was more pigment in the mix, then a lighter second coat where the paint was watered down to stretch it for a second coat. Using this material I can get a range of different colors, depending on the application. Now the interesting part. This paint shows EVERYTHING. It absorbs into the grain and reveals the underlying texture, and highlights every imperfection. The tool chest looks like absolute shit. And I love it.
Here's a photo of some plane marks left behind and accentuated by the milk paint:

The end result is something that has unequivocally been created by human hands with attention and care (if not skill lol). You simply won't get this finish from a factory.
And my absolute favorite part? It's completely nontoxic. I painted the relatively large tool chest in my enclosed garage, in the winter, no fumes to deal with. When I spilled a bit on my pants I scrubbed it out with soap and water. When I am finished, I can pour the whole lot down the sink without worrying about introducing VOCs into my water supply! It's milk and borax!
I am from this point forward no longer using commercial paints for any but the most durability critical applications. No more waiting for household hazardous waste day, no more painting with a respirator with the garage doors wide open in 30 degree weather. Paint doesn't have to be toxic waste!
Next I will build a step stool for my little one and plan on finishing with milk based oxide paint. I can rest easy knowing that if she chews on it she will be safe. For that project I will also be investigating the use of homemade hide glue as an alternative to modern, plastic glues. It can be made with gelatin and salt. I've even heard of people using gummy bears.
This is one of the cooler things I've done and I wanted to share it with y'all. It really makes me reflect on what we've sacrificed in the name of "convenience" and "durability"

My rental unit has a gas fireplace that's controlled by remote. The remote fell about 3 feet and the LCD shattered. The remote is still functional, the screen is just cracked and bleeding. Replacements cost $100 and I'm on the hook for it if my landlord finds out. Haven't been able to find any cheaper compatible remotes either.
Any thoughts about how I might be able to track down a replacement LCD? Is it even worth it? The LCD seems pretty specialized.

I looked up how to build a ladder and this how stuff works post was a top hit.
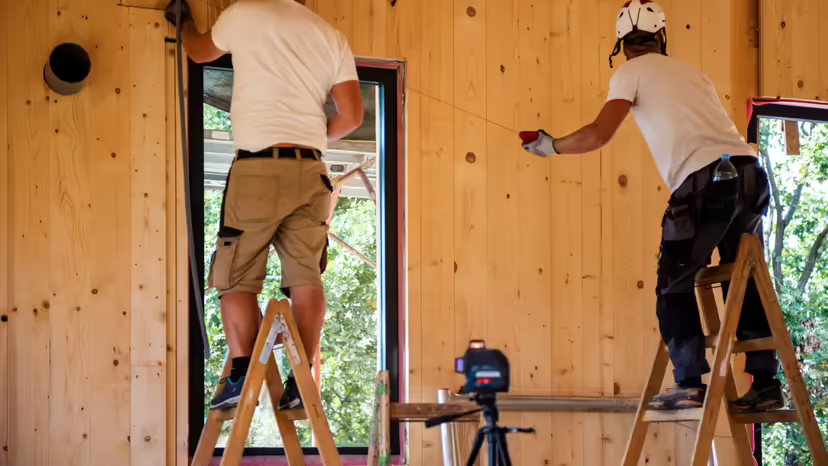
What the fuck is going on here. I have never seen anyone stand on a ladder like these 2 dudes. Is this an acceptable way to use a ladder????
hi comrades  update poooost
it's been a bit. three months or so since the last post. this project is deeply near and dear to my heart and it's not abandoned but there was a bit there where i fell off the face of the earth and i wanna fill in that gap.
i've been off and on for the past three months, but for the past two weeks in particular i've been on. i made a commitment to myself to spend time on this before work - this is my most valuable and reliable time slot in a day - and i've been reliably making updates every single day i haven't had a prior obligation. it's a habit now. i've been deeply personally turbulent lately, much more for better than for worse but in ways that really take most of my awake time - except this before work slot. wouldn't want to spend it on anything else. 
the posts dried up for two reasons - one, the development recently has been feeling like the last leg of a marathon. nothing new is really happening, there's no news besides that i'm closer than i was last time, and there's nothing notable to report until i actually dot the final i and cross the final t and then i buy one and i get it in my hand. two, writing the posts actually took a lot of time - i was finding a few hours per week for sphynx time, and post-writing became one or two of them, because i care a lot about documentation and presentation and communications. that's kinda not sustainable. my fix for this has been taking things to matrix. sphynx has a matrix room now. i find it FAR more sustainable to bang out a couple quick 30 second messages when i finish up a work session than writing a post aggregating all of those every week or two. if you want know if/when/how i'm still working on the project, you can either check the git logs, which is where most of the work will live, or join the matrix room for more interactive and human readable updates (and even a place to hang out??). DM me your matrix handle for a link ✨
as for technicals, here's a brief summary of what i've done since the last post:
realistically, this is the last post until i have the sphynx lite RC2 in my hand. as it stands this is likely my whole work sesh for the morning but i dearly love you all and you deserve to know what i'm up to and this was a good use of my morning. thank you for everyone who's been following. let's talk soon. 
What did I expect from a $50 chair, but now it works.

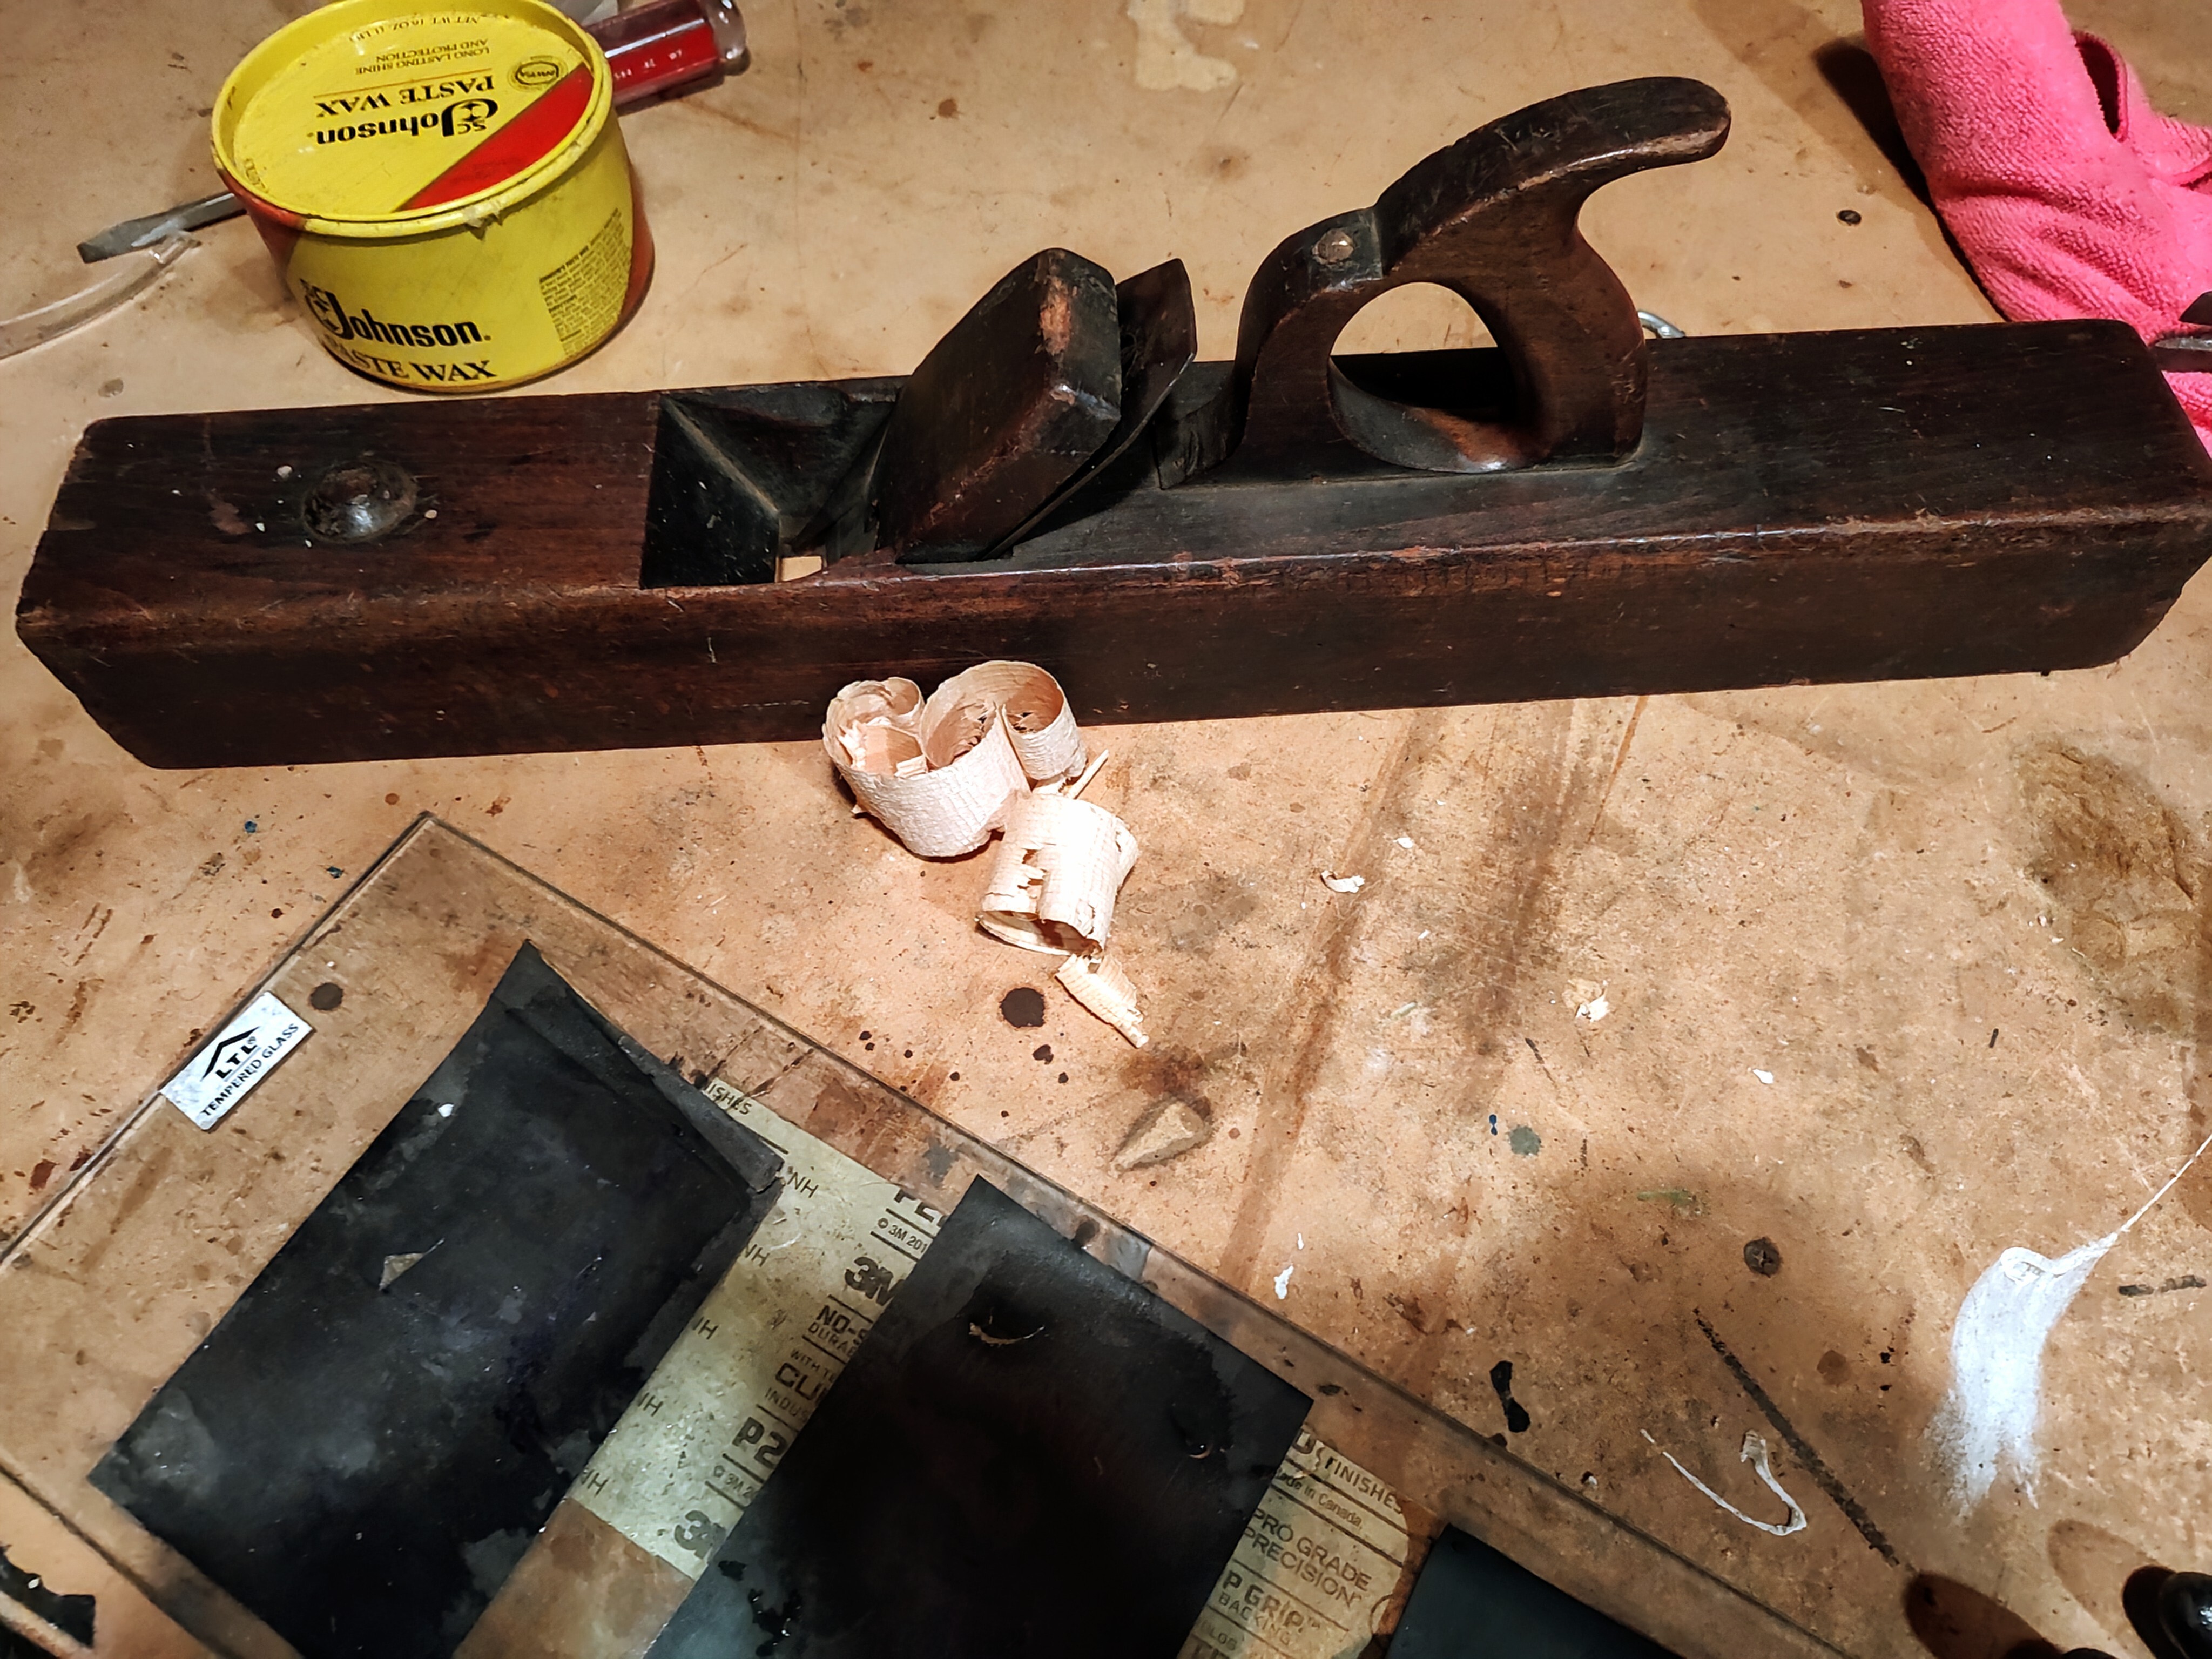
18th century joiner plane. All it needed was a little flattening, and sharpening of the iron and chip breaker. It takes a beautiful shaving now.
I am working towards building my own workbench. When I moved in there was one in the garage already but the top is MDF, and it's way too wide at like 5 feet. I hate that I can't walk around it or reach the other side, it gets mad dirty back there.
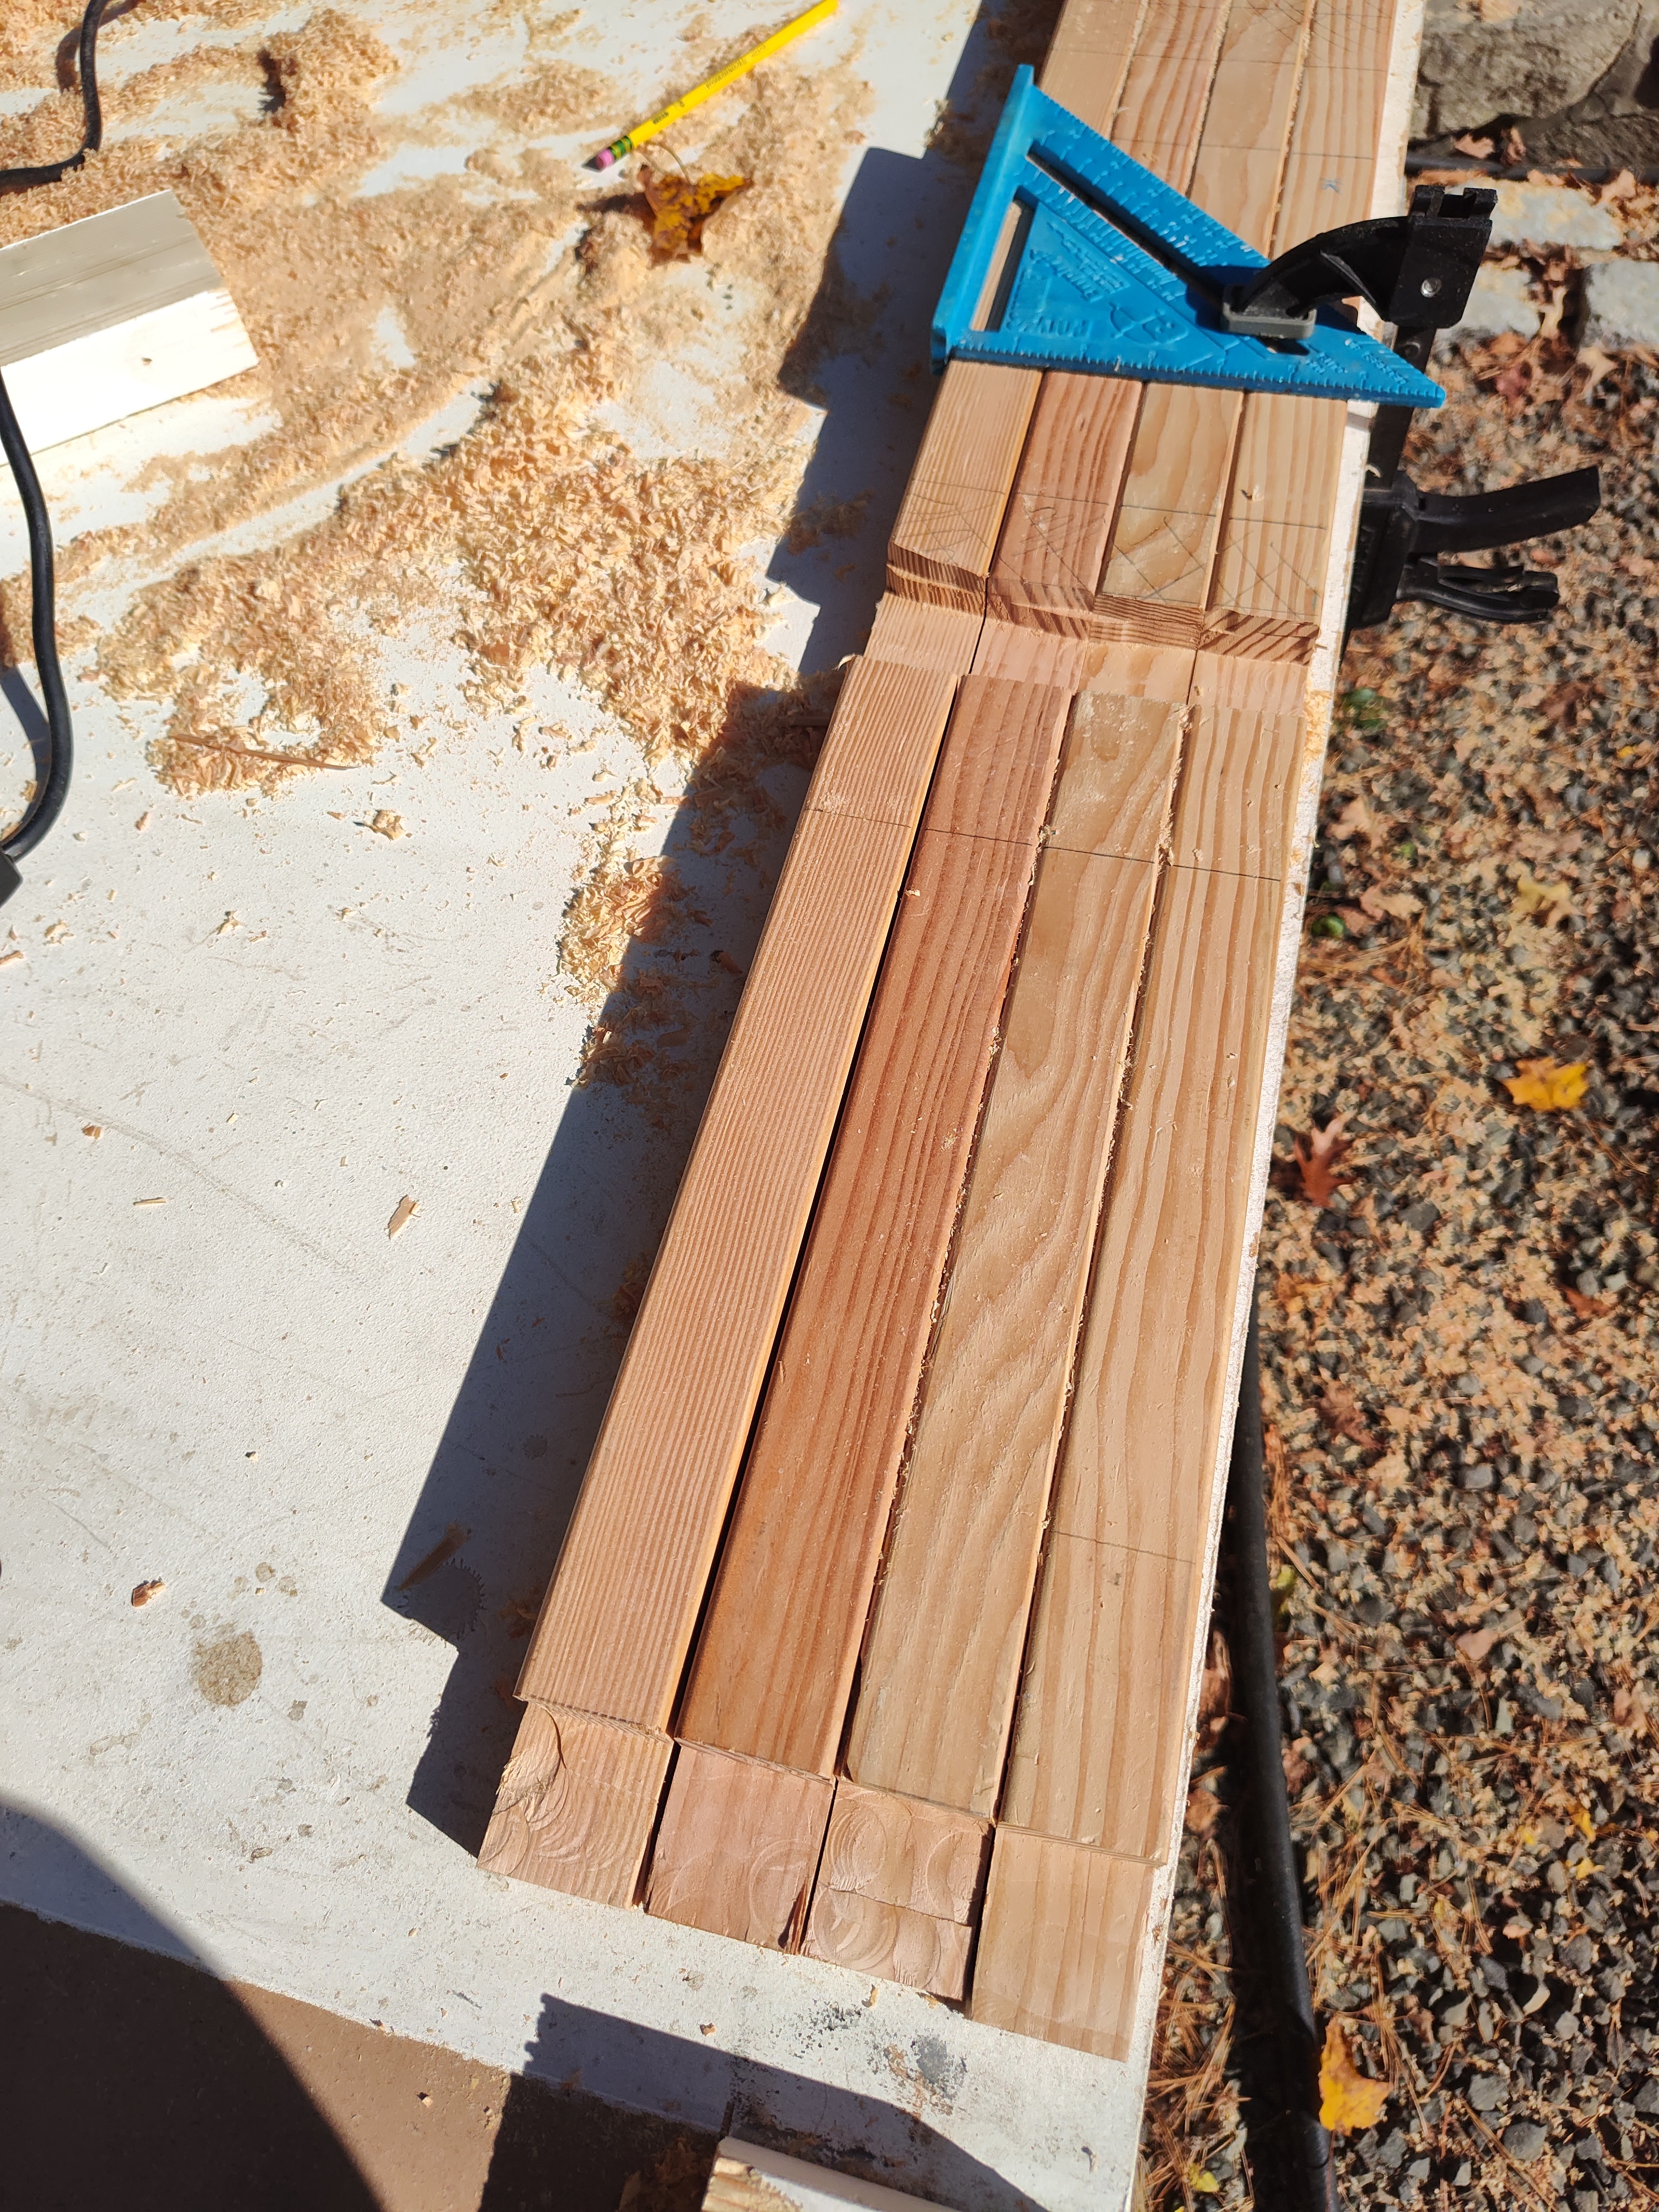
I am going to make a fore plane next, but before that I need to make floats. Then I will be all set.
We have these 2 paver steps that are awkwardly tall. I'd like to add 2 steps to this by adding another layer of pavers to the lower step here, then adding 2 steps going off of that.
Would it be a bad idea to just lay the new steps directly on the existing ground level patio steps?
I've seen mixed guidance on using construction adhesive vs just polysand. Any thoughts on that?

I bought a cheap router at a flea market and thought it would be good to do some shop shelves as a learner project. These are the rails for the shelves that slot into the legs with lap joints. I was going to drop some 2*4 spreaders in to the top and cut the grooves on the wrong goddamn face and now I have to redo them, and of course, don't have the material so I have to go to the fucking hardware store now
Diy rule of thumb, take the time estimate for completing a project and multiply it by 3... Or 12 lol
Hi comrades! I'm back! Sorry for the delay! I've been keeping busy, with this project, with work, and with getting familiar with a new town. This update is fun because it's actually entirely devoid of electrical engineering nerd shit! Since last update, I've focused on two things - getting the framework of a website together, and actually getting usage hours on the device so I can know how it handles, what it's missing, what it does well, etc. I'll break this update into those two sections.
I think I have about 5 hours in the device so far, with I'm guessing a couple thousand or so pulses. I've tested my face, eyebrows and beard, I've tested my hands, I've tested my arm, I've tested my leg, and I've tested my chest. The general routine is as follows:
Some areas are clearly not regrowing, others, it's too early to make a call, but I'm pretty confident that it'll be minimal, possibly even better than salon electrolysis, due to a number of advantages to self-work that I'm finding that I'd love to detail here. There are some cons too.
I also have some notes on equipment:
This isn't all inclusive, but I'm definitely happy to get thoughts down prior to starting work on the manual! which leads us to...
It's on jekyll now! We're finally ready to start hosting actual, real content there! So, so many thanks to @Edie@hexbear.net , who actually single-handedly ported the old single page splash screen to Jekyll and on top of that pushed out a bunch of fixes for my sloppy half-assed jekyll code. I really, really appreciate you, you're genuinely helping both to motivate me by both making indispensable contributions, and also just by being a person out there in the world doing this with me. 
The appearance and organization are both super preliminary, and there's not any actual content, and the design is also very much a prototype. The important thing is that now I (or anyone else!) can just write markdown and have it reflected online in an easily readable and shareable format. Email patches are a great way to get both code and content on the page, I try to review them at least twice a week or so. Now that things are set up, it's extremely convenient to put content up. I think to pilot the website, I'm going to make a more formal tutorial for the pencil based probe to start. The one I made per @YearOfTheCommieDesktop@hexbear.net's instructions is still doing phenomenally, thank you for your research and development. Similar thanks for being a part of the project in a meaningful way and making this a team effort.
Come take a look! https://sphynx.diy/
So the project is hitting a bit of a fork, where we finally have multiple parallel work streams at a time - the online manual needs to be designed/written, and the RC2 version of the PCB needs to be designed and ordered. I have a list of changes from working with the RC1 that I'll be rolling in, that'll be the next post. I'm also going to start using https://todo.sr.ht/ to track issues, both to keep myself organized and to publicly advertise what we need to get done in a neat encapsulated way. I'll have details for that up on an #8.5 post in a couple days. For now, honestly I feel bad for drastically overrunning my two week timeline and leaving y'all in the dark for so long, so this post is going up ASAP. I've been busier than usual and probably busier than I plan to be in the future, so I'm more optimistic for a timely #9 post, although that may be in three weeks and not two due to some plans of mine.
I love y'all. RC2 might be the release. We're just weeks away from other people benefiting from this project materially, it's just refinements from here. Thanks for the support, and you know the drill, stop by, say hi, ask questions if you want to understand things better, make suggestions, all of it. See ya next time.

it's in and it's built and it FUCKING WORKS, at least like 80% of the way - I haven't fully put it through a full round of testing yet but every single functionality I've tested - including things that were first-time builds that I hadn't prototyped yet, like the adjustable LDO on the output and the double schmitt trigger falling edge detector, all seem to work! I even splurged a little bit and got some trans knob caps .

I don't know what to tell you, read 'em and weep. The board is built, you see it, it goes hard. Pretend my soldering isn't shitty and I cleaned the flux off. 
Full list of things that work:


 . It worked great for a few minutes and then I soldered in S1 and it stopped working.
I don't know if it has any new bugs when specifically connected to a human being. I suspect that if I were to try to use the current sink on the low side of the probe, which I'm bypassing right now, it'd be whacky - I never made an effort to resolve that bug, and I think I might just descope that to get this thing done at all. I'm already longing for a fresh start on some things that I think I can get by launching into the microcontroller-based version of this. There are already enough redundant safety measures in place for me to feel comfortable, although I'd really like to test the JFET current limiter, which I didn't populate because I couldn't source a good JFET and I also couldn't be assed to determine the correct resistor value. I'd really like either that or a current limiting diode on the high side of the amplifier before I call this done. That's going into the next rev. There are also some non-breaking bugs that I still need to design out, like for example I designed in 20K potentiometers for the current and time control, but Alps Alpine only makes 20K potentiometers in audio trim, meaning the knob angle isn't really one to one with the output. I need to replace those with different values. Other little things like that too.
I'm going to work with the board for a bit and see how it handles! I need to get some hands-on time with it to truly learn how it works, what it's missing, and what I need to change. I'm also kind of just looking to reap the benefits of this thing personally to be honest, I'm getting really tired of shaving 
(plus i'm meeting some girls who are kinda into this thing and might wanna go hour for hour on some mutual aid electrolysis time over comfort shows and snacks on the couch 
 )
)
I think the "alpha" model of releases was a mistake. Because of the nature of hardware development, I think I'm going to change to a "release candidate" model - it makes it clear that any RC board isn't ready to be used, and it allows me to promote any one at any time once I've designated it good enough. So, I'll begin work on RC2 once I'm deeply familiar with this board!
I'm also deeply neglecting the site, mainly @Edie's jekyll port that I really deeply truly appreciate and I never figured out how to apply the patch for. I'm sorry friend 💔 Can you work with me to get that patch applied? I tried to tackle it on a super low executive function day and I just made so little progress applying your patchset and I wanna have it up so bad but it was fighting me and I needed rot time and I quit trying after like twenty minutes 
There are kind of a few things actually! In no order of priority, with loose guesses at difficulty:
If any of these things sound like a thing you want to make an attempt at, let me know! I'll work with you to get you started.
sloppy post today, this is deeply not accessible for non-technical audiences and leaves a lot out, so please let me know if you want deeper explanation on anything and i'll add detail! I just wanted to make sure i got my post up to let you know I'M STILL FIGHTING BABY
i'm still very not settled with the move, and burnout is closing in with my job and my new trans social life, but I'm at equilibrium, I'm okay to keep spending the amount of time I am on this, but I wish I could be spending just a little more. Life is okay though. Great, even. 
As always, stop by, hang out, say hi, ask questions, tell me what you've been up to, design review me, however you'd like to be involved is good by me! I'll see you in the comments 🥰

Finally, a comm for that one user who hand-makes longbows. This ones for you, comrade.

